Independently set the trap in the kitchen: walkthrough
When performing repairs in the kitchen, in which there is a replacement kitchen sink, sooner or later be faced with the removal of the old and installing the new siphon. By itself, the replacement of the siphon under the sink task uncomplicated: it requires a minimum of time, instruments, only the understanding of the principles of the sink unit in the kitchen. At the same time from the installation of this device depends on the liquid drain in the sink. Therefore, the operation for mounting the siphon into the kitchen should carry out, subject to certain rules.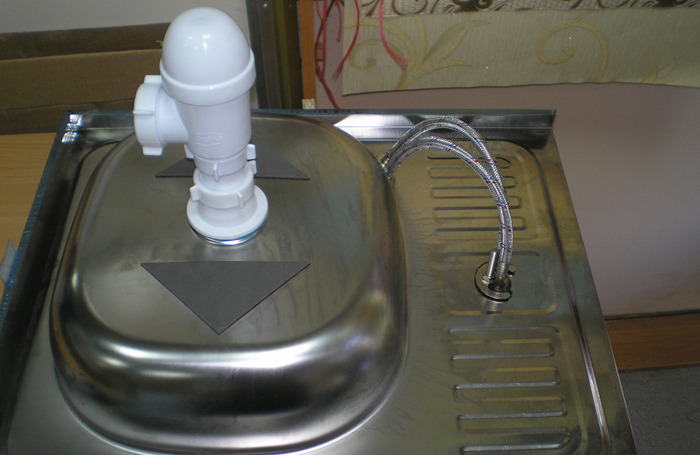
appointment siphon
Siphon - a water trap, whose function is to discharge into drains contaminated water and prevent the penetration of the apartment fumes and gases. Due to the curvature gidrozaslona water does not leave it completely, It is becoming a shield between the sewage smells and location.
Stock traps for the kitchen are made of plastic or chrome-plated metal. The advantage of plastic is their nonsusceptibility corrosion and failure to collect garbage. Chrome products look presentable, but that their superiority and limited.
Besides, depending on the functionality, gidrozaslony are following:
- for siphons or single wash to washing with several sections;
- routine and branches to connect the dishwasher and washing machine;
- bottle type and tubularly.
Regardless of the type of scheme gidrozaslona its installation is carried out according to the same principle with a few additions to the siphon with overflow and double sink.
installation
The process of replacing the siphon under the sink begins with its acquisition and at this stage it is necessary to observe the following rules:
- First is to decide on the, what type of device is suitable in a specific case, whether it be connected to home appliances, whether the sink design features.
- When buying special emphasis on the integrity of the components, of which the siphon. Chips and cracks are unacceptable for a device.
- Separate checks for the correct number of shims, their integrity and compliance with the dimensions.
After the acquisition of the necessary parts can begin the process of collecting the siphon and its installation. However it is necessary to dismantle the old device before it, if it's necessary.
Disassemble the old Siphon
To remove the old trap, We need to unscrew the center screw drain grating with a screwdriver. Pre-necessary to put a basin or pan under the drain place. If the nut and the screw baked onto each other under the influence of prolonged contact with water, perform the following operation. The lower part of the siphon must be disconnected, a tube left in place. Careful fitting rotation helps nuts and screws free.

Once the siphon is removed, drain hole should be thoroughly cleaned. Besides, desirable to clean the funnel and draining of accumulated dirt. This will protect against possible blockage.
Assembly
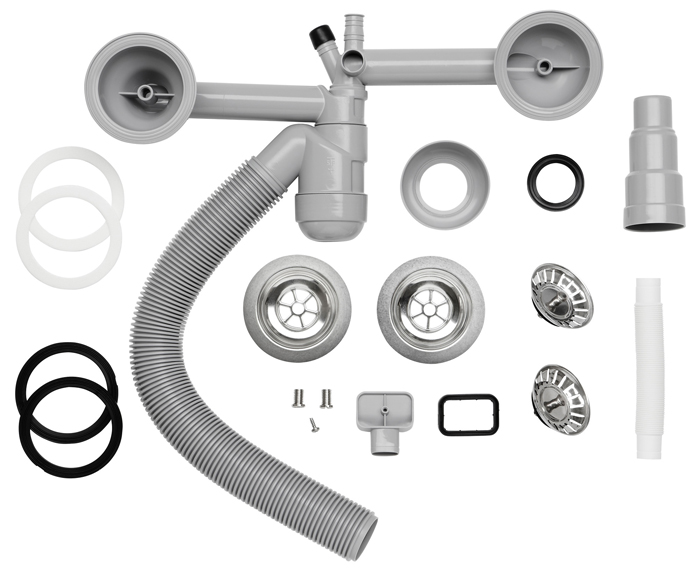
on, how correctly assembled gidrozaslon, It depends on the quality of life and its subsequent operation. When buying initially assembled device it is recommended to take it apart to check for seals and provided strength tightening fasteners, then raise yourself.
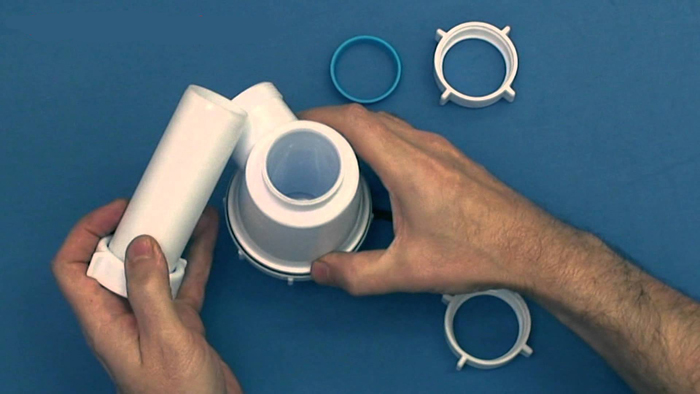
Siphon assembly for sinks made entirely by hand, without tools. note: too much delay leads to the rubber gasket by displacement and disruption of the thread on plastic parts.
siphon assembly begins with the lower stopper. The stacked annular gasket groove and sealant greased. Next, screw cap. Getting to the pipe: on the narrowest part fits union nut and gasket, suitable for diameter. Thereafter, pipe is inserted into the upper opening and twists gidrozaslona. In the next step in the corrugated pipe fits union nut, stretched gasket, after which the corrugation is connected to the siphon.
It is worth noting, that the various siphons models have certain nuances, described instructions, the enclosed. Before you start collecting, We need to study it carefully, to avoid further problems and misunderstandings.
installation gidrozaslona
Installation operation start by, that the tube is inserted under the sink basin. Above the sink is installed metal strip, under which a special gasket is placed. When a screwdriver is twisted screw, constricting nozzle and trim.
In order to properly connect the drain, it is important that the upper edge of the mesh does not protrude above the shell bottom, otherwise the water will stand around. Often manufacturers shells are made more in-depth drowning bottom nozzle, than his plane. In substandard products stamped drain hole deep enough, which leads to the problem described. If such a situation occurred, gasket, used for a decorative plate, and the joints need to lubricate the sealant.
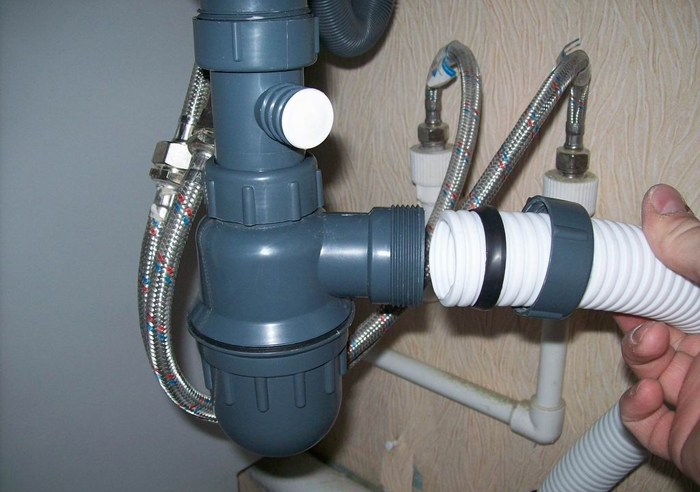
The next step is to connect to the sewer. This is done by means of a rigid or corrugated tube. It is important to make this operation so, that the horizontal portions of the assembly does not sag during further operation. Therefore, parts of the frame must have a minimum length. Besides, drain hose is nowhere to be crossed and twisted.
After the installation of the siphon in the kitchen complete device worth checking for leaks.
Accent your attention: if the siphon additional outlets are provided they must be closed with special caps.
If the leaks as a result of verification is not detected, the equipment to be connected to additional taps on gidrozaslone: washing machine or dishwasher. They drain hoses must be secured with clamps, to avoid disruption, possible due to high pressure during draining water.
Mountable siphon with perelivom
Installation under the sink siphon with overflow has several features, compliance with which ensures trouble-free operation of the device.
Overflow in the shell is an opening in the upper wash section, which is connected to the siphon using the pipe. overflow function - the outflow of water at an excessive filling of the shell and preventing leakage to the floor.
Gidrozaslona assembly for sinks with overflow occurs on the same principle, as for a standard wash. The exception is, the, that when the device is assembled need further collect overflow. This is done as follows:. Perel worn nut and ringed gum, whereupon it is inserted in the outlet, where the nut is twisted. Then overflow is connected to the sink using screws and screwdrivers. Further mounting the siphon system is not different from the procedure described.
The shell with two sections
The acquisition of two-piece sink requires the installation of double trap. Two separate as an alternative suitable and even reduce the risk of clogging, but will take place twice, Unsustainable, especially when connecting additional equipment.
Siphon for sink with two sections is bottle or tube, with one or two levels.
Install a siphon in the kitchen, if the sink has a number of sections is not difficult, than standard, but the procedure is slightly different. Firstly, you need to tie the decorative metal plates to both the drain hole, not forgetting the gasket. Further, with nuts screwed on two pipes to drain hole. If there is a sink overflow is necessary to connect a hose to the overflow.
After that, two branch pipes are connected by conductor, then it is going to the rest of the siphon design and connects to the sewer system. To improve the sealing elements can use a sealant.
After the design collection should make sure, that there are no leaks, whereupon additional equipment can be connected. Now you know, how to set the trap for the kitchen.